Quick Start with Cube App SDK for iOS
Last Updated on: 2024-05-31 08:41:41
Cube App SDK for iOS supports the comprehensive and flexible development of mobile apps. This tutorial walks you through a few steps to get started with the SDK and develop a preferred app within two hours. You will learn how to implement the following features:
- Register an account of the app with a mobile phone number and log in to the app with the account.
- Create a home for a logged-in account and view and modify details of the home.
- Use a smart light as an example and pair the light with the app.
- Use the app to switch on or off the light and adjust its brightness.
You can go to GitHub and download the sample code for the different features mentioned in this tutorial. Then, you can integrate the required sample code into your SDK development on the Tuya Developer Platform.
App SDK Development GitHub Sample
Preview
This tutorial along with specific panel development helps you create the following sample app for iOS.

Preparation
Before you start, the following requirements must be met:
-
An account of the Tuya Developer Platform is registered, an app is
built on the platform, and the values of
AppKeyandAppSecretof the Cube App SDK service are obtained. For more information, see Preparation. - A product, such as a smart light, is created. To get the product, visit TuyaGo.
- The Cube App SDK for iOS is integrated into your project with CocoaPods. For more information, see Fast Integration.
Step 1: Register a user account
In this section, only registration and login with mobile phone number is described. The SDK also supports registration and login with email addresses, third-party accounts, and anonymous accounts. For more information, see User Account Management (iOS).
To implement registration, you must:
-
Set the
countryCodeparameter to specify the country code. This way, the data center closest to users’ location can be selected to serve workloads in the cloud. For example,countryCodefor America is1and that for mainland China is86. For more information, see Cloud Services.Note
The data in different data centers is isolated from each other. Therefore, an account that is registered in America (1) cannot be used in mainland China (86). Otherwise, an error message is returned to indicate that the account does not exist.
-
Frequently call the
ThingSmartUserobject. This object is a singleton that stores all data of the current user including login and registration methods. For more information, see User Account Management (iOS).
Query areas for the verification code service
To strengthen data security, Tuya has optimized the verification code service and placed limits on accounts. The verification code service is available only in limited areas. We recommend that you query the areas in which the verification code service is enabled on the Tuya Developer Platform for your account.
[[ThingSmartUser sharedInstance] getWhiteListWhoCanSendMobileCodeSuccess:^(NSString *regions) {

} failure:^(NSError *error) {

}];
The return value of regions indicates one or more countries
or areas that are separated with commas (,). For example, 86,01 can be returned. For more information, see Global deployment.
Note
Currently, the verification code service is activated by default in mainland China. If you want to launch your application in other countries or areas, you must verify that the verification code service is available in a specific country or area and contact your account manager of Tuya or submit a ticket to activate the service.
Get a verification code to register with a mobile phone number
Registration with a mobile phone number is similar to other common registration methods. To proceed with the registration, users must get a verification code. You can use the same API method to send verification codes to an account that might be registered with a mobile phone number or an email address. The verification codes are required in multiple operations. For example, register an account, modify a password, log in to the app, or complete account information.
NSString * region = [[ThingSmartUser sharedInstance] getDefaultRegionWithCountryCode:countryCode];

[[ThingSmartUser sharedInstance] sendVerifyCodeWithUserName:userName // The phone number or email address.
                                            region:region
                                                 countryCode:countryCode // NSString, like `86` or `01`.
                                                           type:1     // The type of verification code. Set the value to `1` to mean the registration verification code.
                                            success:^{
                                                      // The request is successful.
                                            } failure:^(NSError *error) {
                                                 // The request failed.
                                                 // The error message is returned by `error.localizedDescription`.
}];
Note
The type parameter must be set to 1.
Otherwise, the registration failed.
Register an account with a mobile phone number
To register an account with a mobile phone number, users must provide the country code, mobile phone number, password, and the returned verification code. For more information, see Register with the mobile phone number and password.
[[ThingSmartUser sharedInstance] registerByPhone:countryCode // The country code, like `86` or `1`.
                            phoneNumber:phone
                                password:password
                                            code:code  // The verification code.
                                success:^{

                                        // The registration request is successful.

                                } failure:^(NSError *error) {

                              // The registration failed.
                                  // The error message is returned by `error.localizedDescription`.
                                        }

];
Log in to the app with a mobile phone number
After users register an account with mobile phone numbers, they can log in to the app with their mobile phone numbers. For more information, see Login with phone number and password.
[[ThingSmartUser sharedInstance] loginByPhone:countryCode
                            phoneNumber:phone
                            password:password
                                success:^{

                                   // The login request is successful.

                            } failure:^(NSError *error) {

                                   // The login failed.

    }];
Step 2: Create and manage homes
The Cube App SDK helps you implement smart scenes for specific homes. This allows users to add, edit, and remove smart devices based on homes. You can also listen for device status changes in the homes. Users create an unlimited number of homes for each user account. One or more rooms or home members can be added and managed for a specific home.
In this section, the objects ThingSmartHomeModel and ThingSmartHome are frequently called.
| Object | Description |
|---|---|
| ThingSmartHomeModel | Stores basic information of a home, such as the ID, name, and location. |
| ThingSmartHome | Stores data of all features that are supported by a home. For
example, a single home and the home members and rooms of the home
can be managed with this object. ThingSmartHome must be
initialized with the correct value of homeId. |
Impotant
Make sure that ThingSmartHome in ViewController or other objects is declared as a global variable (@property). Otherwise,
a temporary variable of ThingSmartHome might be released
during initialization due to the scope limit, and thus nil is returned.
Create homes
Users can create one or more homes for each logged-in account. Then,
rooms, members, and devices can be managed based on the homes. To
create a home, call the API method addHomeWithName in ThingSmartHomeManager.
[self.homeManager addHomeWithName:name
                  geoName:city
                  rooms:@[@""]  // we could add rooms after creating the home , so pass a null list firstly .
                  latitude:self.latitude
                  longitude:self.longitude
                  success:^(long long result) {

                                              // Added successfully. The value of `homeID` is returned.

                  } failure:^(NSError *error) {

                                                // Failed to add a home.

                  }];
Query a list of homes
You can get a list of homes for a logged-in account. If no home is created for the account, an empty array is returned.
    // Returns a list of homes and refreshes the TableView.
    [self.homeManager getHomeListWithSuccess:^(NSArray<ThingSmartHomeModel *> *homes) {
      // The request is successful and the UI is refreshed.
      //  [self.tableView reloadData];
    } failure:^(NSError *error) {

        // The request failed.

    }];
Best practices
After a home is created, subsequent operations are implemented based on the home. For example, rooms, members, and device pairing can be managed for the home. Therefore, we recommend that you store the home data as a global variable for the app. You can locally switch the current home as needed. The Platform does not record this change. In the sample code for this tutorial, the first home in the list is specified as the current home by default.
+ (ThingSmartHomeModel *)getCurrentHome {

    NSUserDefaults *defaults = [NSUserDefaults standardUserDefaults];
    if (![defaults valueForKey:@"CurrentHome"]) {
        return nil;
    }

    long long homeId = [[defaults valueForKey:@"CurrentHome"] longLongValue];

    if (![ThingSmartHome homeWithHomeId:homeId]) {
        return nil;
    }

    return [ThingSmartHome homeWithHomeId:homeId].homeModel;
}

+ (void)setCurrentHome:(ThingSmartHomeModel *)homeModel {

    NSUserDefaults *defaults = [NSUserDefaults standardUserDefaults];
    [defaults setValue:[NSString stringWithFormat:@"%lld", homeModel.homeId] forKey:@"CurrentHome"];

}
The preceding code block allows you to simplify the following home operations:
-
Query a list of homes:
self.home = [ThingSmartHome homeWithHomeId:[ThingHome getCurrentHome].homeId]; -
Set a home ID:
[ThingHome setCurrentHome:xxx];
Step 3: Pair devices
After users pair a device with the app, the device is connected and registered to the cloud and can communicate with the cloud. The Cube App SDK empowers smart devices to be paired in multiple pairing modes. For example, they can be paired over Wi-Fi and Bluetooth. For more information, see Device Pairing (iOS) and Bluetooth LE on iOS.
Pairing modes
In this section, the Wi-Fi pairing modes are used as an example to describe how to integrate the SDK and register a device to the cloud.
Wi-Fi pairing modes include: Wi-Fi Easy Connect (EZ), Access Point (AP), and QR code. In the later versions of the Cube App SDK for iOS, we recommend that you use the AP mode instead of the Wi-Fi EZ mode. The former trumps the latter when it comes to the following aspects:
- Compared with the Wi-Fi EZ mode, the AP mode results in a higher success rate, optimal reliability, and fewer compatibility requirements for mobile phones and routers.
- The app built with Xcode 12.5 cannot send the EZ pairing data packets from iPhone that runs iOS 14.5 or later. In this case, the permission com.apple.developer.networking.multicast must be enabled for the app. This permission must be approved by Apple before it can be enabled. As a temporary solution, you can use an earlier Xcode version, but the AP mode is still recommended.
Get the pairing token
Before the AP pairing process, the SDK must get a pairing token from the cloud in the networked state. The token is valid for 10 minutes
and expires immediately after the device is paired. A new token must be
generated if the device needs to be paired again. To get a token, the current
value of homeId must be provided. Therefore, during this process,
the account must be in the logged-in state and at least one home is created
for the account.
[[ThingSmartActivator sharedInstance] getTokenWithHomeId:homeId
                                                success:^(NSString *token) {
                                            //  NSLog(@"getToken success: %@", token);
                                                                               // You can start ConfigWiFi now.
                                          } failure:^(NSError *error) {
                                         //NSLog(@"getToken failure: %@", error.localizedDescription);
                                         }
];
Compatibility with iOS
iOS 14
Starting from iOS 14, when users implement device pairing or control over a local area network (LAN), the local network privacy setting dialog box is triggered.
- The app can send data to the LAN only after users tap OK.
- Otherwise, if users tap Don’t Allow, the app cannot access the LAN.
Currently, Apple does not provide APIs to process this privacy setting. We recommend that you guide users to allow the app to access LAN data when features that require LAN connection cannot work. Specifically, go to Settings, choose Privacy > Local Network, and then allow the app to access the LAN.
iOS 13
Starting from iOS 13, if users do not allow the app to access location
data, when the Wi-Fi feature is enabled, [[ThingSmartActivator sharedInstance] currentWifiSSID] cannot get a valid Wi-Fi service set identifier (SSID) or basic service
set identifier (BSSID). In this case, iOS returns the following default
values:
-
SSID:
WLANorWi-Fi.WLANis returned for users in mainland China. - BSSID:
00:00:00:00:00:00.
Start pairing
Before the pairing process is started, the device must keep a state pending pairing. To set the device to this state, you can guide users to follow the device user manual.
To call the API method startConfigWiFi, you must provide the SSID of the router (the Wi-Fi name), password, and the token obtained from the cloud.
[ThingSmartActivator sharedInstance].delegate = self;
[[ThingSmartActivator sharedInstance] startConfigWiFi:ThingActivatorModeAP
                                                ssid:ssid
                                            password:password
                                               token:token
                                             timeout:100];
Note
The timeout parameter is set to 100 by default.
Unit: seconds. You can specify any preferred value. However, a small
value is not recommended. A proper value can ensure the optimal pairing
performance.
In AP pairing mode, you must implement the protocol ThingSmartActivatorDelegate and listen for the callback of the pairing result.
@interface xxxViewController () <ThingSmartActivatorDelegate>- (void)activator:(ThingSmartActivator *)activator didReceiveDevice:(ThingSmartDeviceModel *)deviceModel error:(NSError *)error {
if (deviceModel && error == nil) {
// The request is successful.
// NSLog(@"connected success: %@", deviceModel.name);
}
if (error) {
// The request failed.
}
// Stops the pairing process.
}(Optional) Stop pairing
After the pairing process is started, the app continuously broadcasts the pairing data until a device is paired or the process times out. To allow users to cancel or complete pairing during the process, you must call the API method stopConfigWiFi.
 [ThingSmartActivator sharedInstance].delegate = nil;
 [[ThingSmartActivator sharedInstance] stopConfigWiFi];
Step 4: Control devices
In this section, the objects ThingSmartDeviceModel and ThingSmartDevice are used.
| Object | Description | Reference |
|---|---|---|
| ThingSmartDeviceModel |
| Device DPs |
| ThingSmartDevice | ThingSmartDevice stores all data of device features,
such as device control and firmware management. You must use the correct
value of deviceId to initialize ThingSmartDevice. | Device Management (iOS) |
Impotant
Make sure that ThingSmartDevice in ViewController or other objects is declared as a global variable (@property). Otherwise,
a temporary variable of ThingSmartDevice might be released
during initialization due to the scope limit, and thus nil is returned.
Query a list of devices
After a device is paired, users can query a list of devices that are created for a specific home.
self.home = [ThingSmartHome homeWithHomeId:#your homeId];
self.deviceList = [self.home.deviceList copy];
Impotant
You must call the API method getHomeDetailInfo first to enable the query. Otherwise, the query will fail even after the device is paired.
View device information
-
DP data is stored in
schemaArrayofdeviceModel.ThingSmartDevice *device = self.device; NSArray *schemas = device.deviceModel.schemaArray; -
All DP data is stored in
schemaArray. Each DP is encapsulated as theThingSmartSchemaModelobject.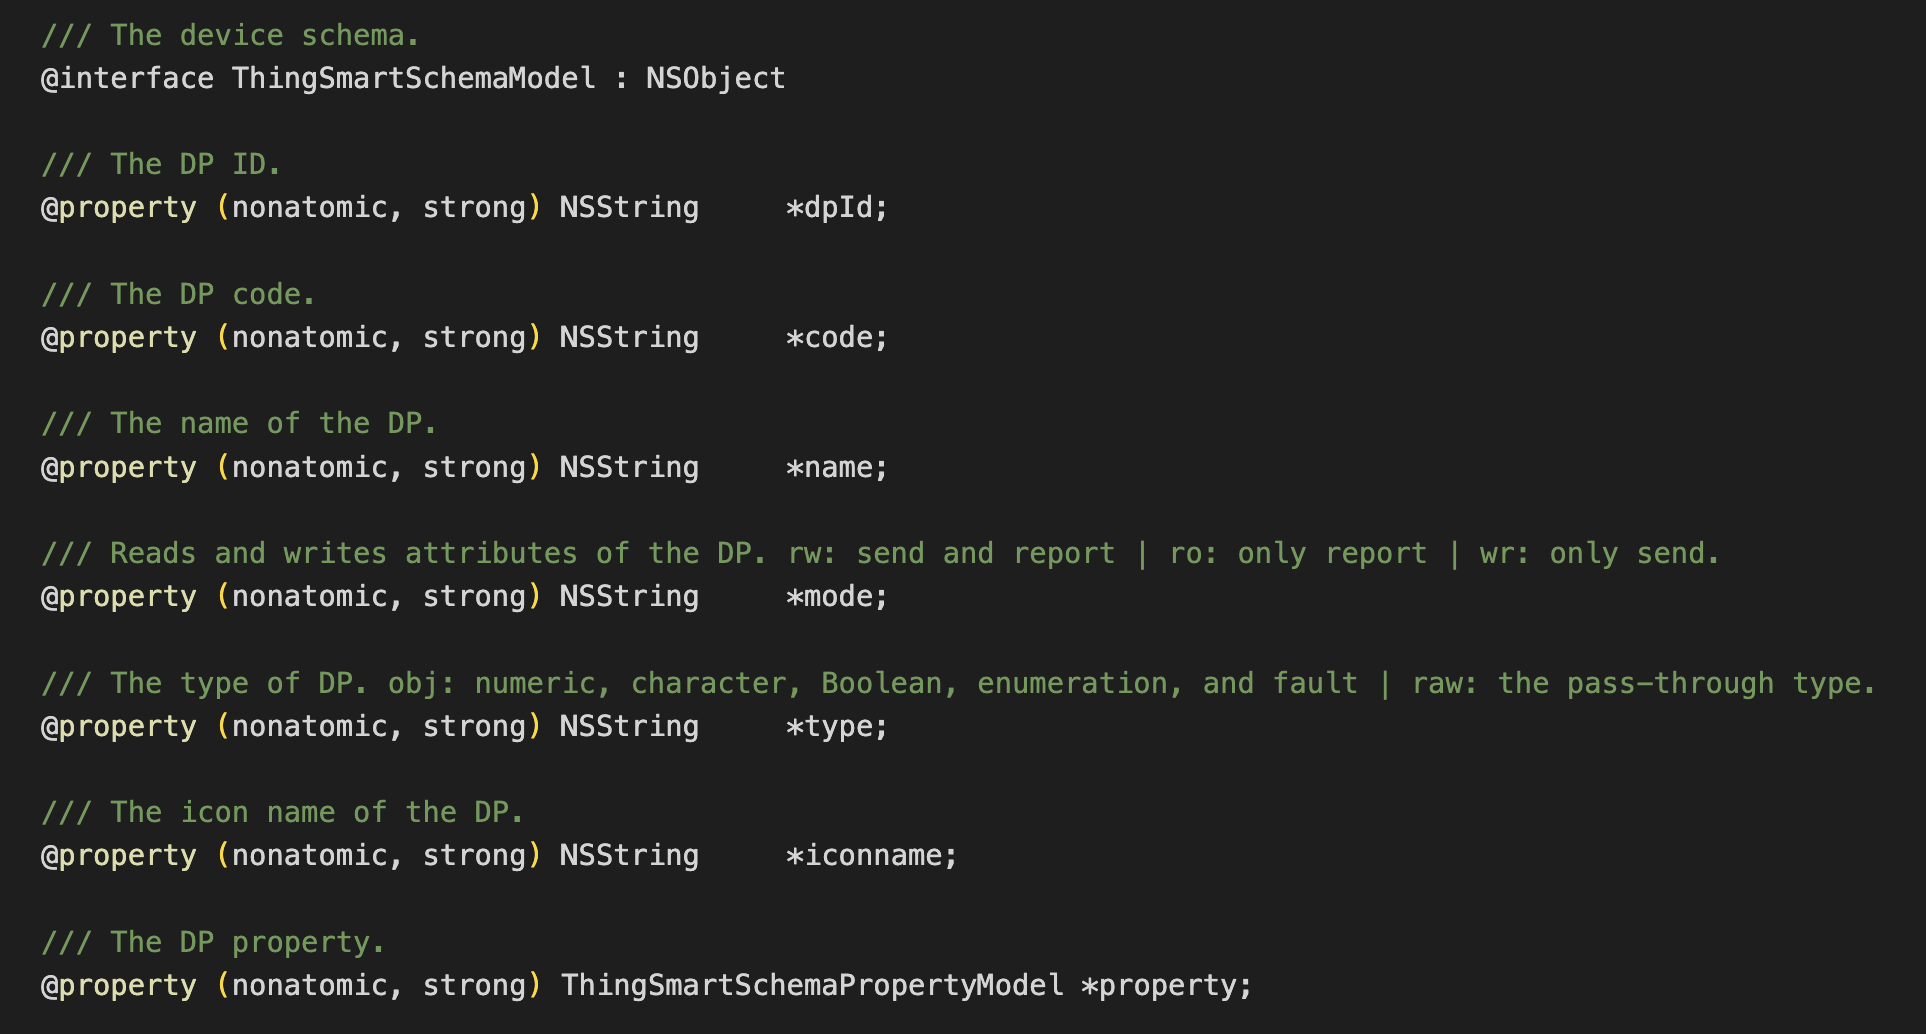
-
Certain complex DPs are further encapsulated in
propertyofThingSmartSchemaModel. Example:NSString *type = [schema.type isEqualToString:@"obj"] ? schema.property.type : schema.type; if ([type isEqualToString:@"bool"]) { SwitchTableViewCell *cell = [tableView dequeueReusableCellWithIdentifier:@"switchCell"]; if (cell == nil){ cell = [[[NSBundle mainBundle] loadNibNamed:@"SwitchTableViewCell" owner:self options:nil] lastObject]; cell.label.text = schema.name; [cell.switchButton setOn:[dps[schema.dpId] boolValue]]; }; } return cell; } else if ([type isEqualToString:@"value"]) { SliderTableViewCell *cell = [tableView dequeueReusableCellWithIdentifier:@"valueCell"]; if (cell == nil){ cell = [[[NSBundle mainBundle] loadNibNamed:@"SliderTableViewCell" owner:self options:nil] lastObject]; cell.label.text = schema.name; cell.detailLabel.text = [dps[schema.dpId] stringValue]; cell.slider.minimumValue = schema.property.min; cell.slider.maximumValue = schema.property.max; cell.slider.value = [dps[schema.dpId] floatValue]; }; }; return cell; } else if ([type isEqualToString:@"enum"]) { //... } //...
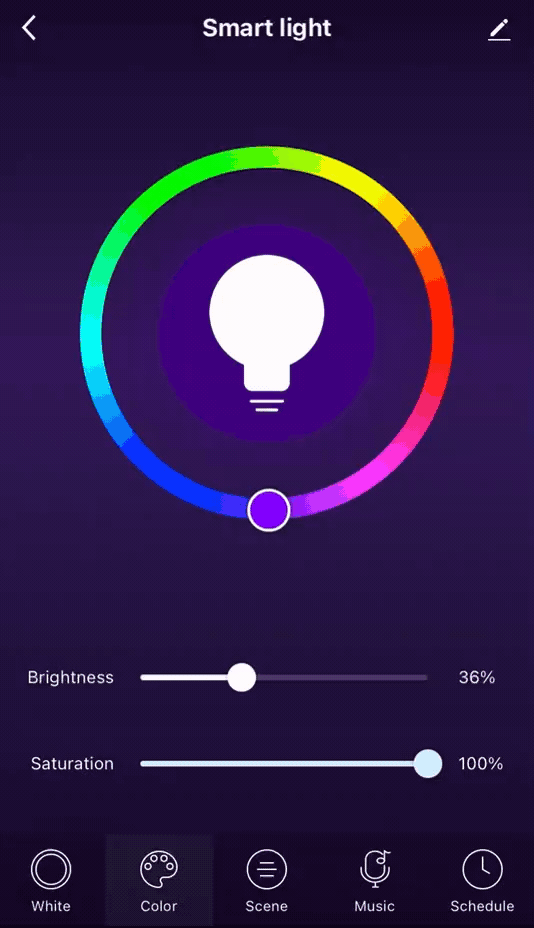
In the preceding code block, the DPs of a smart light are displayed in TableView. The following settings are applied:
-
The switch data is displayed in
cellfor whichtypeis set to bool. -
The brightness data is displayed in
cellfor whichtypeis set to value.
Control a device
To enable device control, you must call the device control API method and send DPs in the NSDictionary format to change device
status or features.
Impotant
The parameter dps can define one or more DPs. Thus, multiple
states of a device can be changed in the same call.
In the following code block, a smart light is used as an example to change its switch status and brightness value.
if ([type isEqualToString:@"bool"]) {

    SwitchTableViewCell *cell = [tableView dequeueReusableCellWithIdentifier:@"switchCell"];
    if (cell == nil){
        cell = [[[NSBundle mainBundle] loadNibNamed:@"SwitchTableViewCell" owner:self options:nil] lastObject];

        cell.label.text = schema.name;
        [cell.switchButton setOn:[dps[schema.dpId] boolValue]];
        cell.isReadOnly = isReadOnly;
        // The light is switched on or off after a tapping event of `UISwitch`.
        cell.switchAction = ^(UISwitch *switchButton) {
            [weakSelf publishMessage:@{schema.dpId: [NSNumber numberWithBool:switchButton.isOn]}];
        };
    }
    return cell;

}
else if ([type isEqualToString:@"value"]) {

    SliderTableViewCell *cell = [tableView dequeueReusableCellWithIdentifier:@"valueCell"];
    if (cell == nil){
        cell = [[[NSBundle mainBundle] loadNibNamed:@"SliderTableViewCell" owner:self options:nil] lastObject];

        cell.label.text = schema.name;
        cell.detailLabel.text = [dps[schema.dpId] stringValue];
        cell.slider.minimumValue = schema.property.min;
        cell.slider.maximumValue = schema.property.max;
        [cell.slider setContinuous:NO];
        cell.slider.value = [dps[schema.dpId] floatValue];

        // The value is changed after a tapping event of `UISlider`.
        cell.sliderAction = ^(UISlider * _Nonnull slider) {
            float step = schema.property.step;
            float roundedValue = round(slider.value / step) * step;
            [weakSelf publishMessage:@{schema.dpId : [NSNumber numberWithInt:(int)roundedValue]}];
        };
    }
    return cell;
}
- (void)publishMessage:(NSDictionary *) dps {
[self.device publishDps:dps success:^{
// The value is changed successfully.
}
failure:^(NSError *error) {
// Failed to change the value.
}];
}
To listen for changes in device status, such as getting online,
removal notifications, and DP data changes, you must implement the
protocol ThingSmartDeviceDelegate.
self.device = [ThingSmartDevice deviceWithDeviceId:## your deviceId];
self.device.delegate = self;
#pragma mark - ThingSmartDeviceDelegate
/// Device information updates, such as the name and online status.
/// @param device The device instance.
- (void)deviceInfoUpdate:(ThingSmartDevice *)device;
/// Device online status updates
/// @param device The device instance.
- (void)deviceOnlineUpdate:(ThingSmartDevice *)device;
/// Indicates whether the device is removed.
/// @param device The device instance.
- (void)deviceRemoved:(ThingSmartDevice *)device;
/// The DP data updates.
/// @param device The device instance.
/// @param dps The command dictionary.
- (void)device:(ThingSmartDevice *)device dpsUpdate:(NSDictionary *)dps;
/// The DP data updates.
/// @param device The device instance.
/// @param dpCodes The DP codes.
- (void)device:(ThingSmartDevice *)device dpCommandsUpdate:(NSDictionary *)dpCodes;
/// The group OTA task progress.
/// @param device The gateway instance.
/// @param groupId group OTA task id.
/// @param type The firmware type.
/// @param progress The update progress.
- (void)device:(ThingSmartDevice *)device groupOTAId:(long)groupId firmwareType:(NSInteger)type progress:(double)progress;
/// The group OTA task status.
/// @param device The gateway device instance.
/// @param upgradeStatusModel The model of the update status.
- (void)device:(ThingSmartDevice *)device
groupOTAStatusModel:(ThingSmartFirmwareUpgradeStatusModel *)upgradeStatusModel;
/// The callback of Wi-Fi signal strength.
/// @param device The device instance.
/// @param signal The signal strength.
- (void)device:(ThingSmartDevice *)device signal:(NSString *)signal;
/// Receives MQTT custom messages.
/// @param device The device instance.
/// @param message The custom message.
- (void)device:(ThingSmartDevice *)device didReceiveCustomMessage:(ThingSmartMQTTMessageModel *)message;
/// Receives LAN custom messages.
- (void)device:(ThingSmartDevice *)device didReceiveLanMessage:(ThingSmartLanMessageModel *)message;
/// The delegate of warning information updates.
/// @param device The device instance.
/// @param warningInfo The warning information.
- (void)device:(ThingSmartDevice *)device warningInfoUpdate:(NSDictionary *)warningInfo;
/// The delegate of changes in device normal firmware/pid version update's status/progress
/// Notice: sometimes the progress may <0, when it occured please ignore the progress.
/// @param device The device instance.
/// @param statusModel status/progress model.
- (void)device:(ThingSmartDevice *)device otaUpdateStatusChanged:(ThingSmartFirmwareUpgradeStatusModel *)statusModel;
/// The tuya message data update.
/// Example:
/// type == property:
/// payload = {
/// "code_name1": {
/// "value": "code_value1",
/// "time": 1234567890
/// },
/// "code_name2": {
/// "value": 50,
/// "time": 1234567890
/// }
/// }
/// type == action:
/// payload = {
/// "actionCode": "testAction",
/// "outputParams": {
/// "outputParam1":"outputValue1",
/// "outputParam2":50
/// }
/// }
/// type == event:
/// payload = {
/// "eventCode": "testEvent",
/// "outputParams": {
/// "outputParam1":["outputValue1", "outputValue2"],
/// "outputParam2":false
/// }
/// }
/// @param device The device instance.
/// @param thingMessageType The message type.
/// @param payload The message payload.
- (void)device:(ThingSmartDevice *)device didReceiveThingMessageWithType:(ThingSmartThingMessageType)thingMessageType payload:(NSDictionary *)payload;
(Optional) Remove a device
You can call the API method removeDevice to remove a device from a specific home.
[self.device remove:^{
        NSLog(@"remove success");
      } failure:^(NSError *error) {
        NSLog(@"remove failure: %@", error);
      }];
Practice result
Now, your app can be built through the preceding steps. The app supports multiple features. For example, register a user account, create and query homes, and pair and control devices.
Next step
To ensure development efficiency, Tuya has abstracted features and encapsulated UI BizBundles from the SDK. You can integrate any of the comprehensive UI BizBundles to meet different business requirements.